

Contents
Help center
SyncDepo help center
Create synchronized depositions, review and adjust timings for quality control (QC), and share the finished files.
Get started
After you sign in to the SyncDepo desktop app, use the start page to choose a task:
- New Sync: Create a synchronized deposition from a transcript and video or audio files.
- Open Sync File: Open an existing
.syncdfile to QC timings or export files. - Sync Queue: Track submitted jobs and download completed syncs.
- Links: Manage depositions you’ve published for sharing.
- Settings: Change your app preferences.
To reopen a file you’ve used before, select it from the recent files list.

Prepare your transcript and media
Before you create a sync, gather the transcript and recordings for the deposition.
Transcript requirements
Use a standard ASCII transcript saved as a .txt file. It must include page and line numbers, with no timestamps or other extra information in the margins.
If you only have a PDF or Word document, request an ASCII copy from the court reporter.

Supported media files
- Video: MP4 (.mp4).
- Audio: WAV, MP3, M4A, AAC, or FLAC.
Each sync must contain either video files or audio files. You can use multiple files, but you can’t mix video and audio in the same sync.
Include every recording and arrange the files in the order they were recorded.
Recommended video settings
For reliable playback and manageable file sizes, use these settings when recording or exporting video:
| Setting | Recommended value |
|---|---|
| File format | MP4 |
| Video codec | H.264 (AVC) |
| Resolution | 1920 × 1080 (1080p) |
| Frame rate | 30 fps |
| Video bitrate | Up to 3 Mbps, variable bitrate (VBR) |
| Keyframe interval | 2 seconds |
| Audio codec | AAC |
| Audio bitrate | 128 kbps |
| Audio sample rate | 48 kHz |
| Fast start | Enabled, sometimes called “Optimize for web” |
Need video encoding software? Download HandBrake, a free video encoder for Windows, Mac, and Linux. Use it to convert your recordings to MP4 with H.264 video and AAC audio.
Or, if you prefer to work in the command line, use ffmpeg. This command applies the settings above and keeps the recording’s original resolution:
ffmpeg -i input.mov -c:v libx264 -crf 21 -maxrate 3M -bufsize 6M -r 30 -g 60 \
  -pix_fmt yuv420p -c:a aac -b:a 128k -ar 48000 -movflags +faststart output.mp4
Clear audio helps SyncDepo match the transcript to the recording. Avoid clipping, excessive background noise, and recordings where speakers are difficult to hear.
Keep your original recordings
SyncDepo extracts and uploads audio to create the sync. Keep the original media files—you’ll need them for QC, package exports, and publishing Links.
Create a sync
Create a synchronized deposition from your transcript and recordings.
Select and check the transcript
- On the start page, select New Sync.
- Select Select Transcript File, then choose your
.txttranscript. - Review the detected witness name, volume, and deposition date. Correct any missing or incorrect information, and complete any additional required fields.
- Check Line Numbers Start on Page and Lines/Page. Compare the page and line numbers in the preview with the original transcript.
Check the numbering carefully
Incorrect page or line numbers will carry through to your synchronized files.

Check where the recording starts and ends (optional)
SyncDepo automatically identifies the transcript lines that contain recorded speech. You can skip this check and still create a sync, but reviewing the first and last recorded lines can slightly improve accuracy.
Lines marked as having no audio appear in gray. To adjust the first or last recorded line:
- Right-click the first line spoken in the recording and select Mark as First Audio Line.
- Right-click the last line spoken in the recording and select Mark as Last Audio Line.

Add recordings and submit
- Select Next.
- Select Add Media File(s), then choose your video or audio files.
- Check that every recording is included and that the files are in recording order. Use the up and down arrows to reorder them.
- Select Continue.
- Review the deposition details, total duration, and credits to be deducted. Select Submit.


If SyncDepo displays a warning, review it before submitting. Select Review Videos to return to the file list, or Submit Anyway if you’ve checked the warning and want to proceed.
Your job appears in Sync Queue. Keep the app open until it finishes preparing and uploading all pending jobs.
Track and download your sync
Open Sync Queue to track your jobs and download completed syncs. Jobs appear in one table, with the newest submissions first.
Understand job statuses
| Status | What it means |
|---|---|
| Pending | The job is waiting to upload or waiting for server processing. |
| Extracting | SyncDepo is preparing audio from your recordings. |
| Uploading | Audio and transcript data are being uploaded. |
| Starting | The server is starting work on your job. |
| Syncing | SyncDepo is matching the transcript to the recording. |
| Complete | Your synchronized transcript is ready to download. |
| Failed | The job couldn’t finish. |

Keep the app open until uploads finish
Jobs with a Cancel action are still being prepared or uploaded on your computer. Keep SyncDepo open and your computer connected to the internet while these jobs are active.
Once uploads finish, Cancel disappears and processing continues on our servers. You can then close the app and return later to download your syncs.
You can add more jobs while others are running. SyncDepo prepares and uploads them in the order you add them.
Download a completed sync
- In Sync Queue, find a job with the status Complete.
- Select Download.
- Choose where to save the
.syncdfile.
SyncDepo saves the file and opens it in the editor, ready for QC.
Download your sync within 14 days
Jobs remain in Sync Queue for 14 days after submission. Download your completed sync promptly—files stored on our servers are deleted after the retention period, which is 14 days by default.
Your downloaded sync doesn’t expire. Once you save the .syncd file to your computer, you can open it, QC timings, and export files beyond the 14-day period. Keep the .syncd file and its original recordings, and back them up.
Published Links follow their own expiration settings.

Cancel a job or check a failure
To stop a job before submission finishes, select Cancel. Jobs accepted by the server can’t be canceled from the app.
If a job fails while preparing or uploading, point to Failed to see the error details. You can select Remove to clear that failed job from the queue.
If you need help, contact support@syncdepo.com with the witness name, deposition date, and any error message.
Review and adjust timings (QC)
Use QC to check that transcript lines match the recording and correct any timings that need adjustment.
Open a sync
On the start page, select Open Sync File and choose your .syncd file. Downloading a completed sync from Sync Queue also opens it in the editor.
Keep the original recordings available for playback.

Understand timestamp colors
Timestamp colors indicate how confident SyncDepo is in the timing. With the default color settings:
| Color | Meaning |
|---|---|
| Green | Higher confidence. |
| Yellow | Medium confidence. Review these timings. |
| Red | Lower confidence. Check these first. |
| Blue | An individual timestamp you’ve manually edited. |
Confidence helps you decide where to focus your review. Listen to the recording to confirm whether a timing is correct.
Check and adjust a timing
- Select the transcript line’s text to jump to its start time.
- Press Space to play or pause the recording.
- If the line starts too early or too late, use the timing controls below the player. Negative values move the timestamp earlier; positive values move it later.
- Replay the line to check your adjustment.
For a precise time, right-click the timestamp and select Edit timestamp. Enter the new time, then select Save.
To undo a change, press Ctrl+Z on Windows or Command+Z on Mac.

Use manual sync mode
Manual sync mode lets you adjust successive lines while listening to the recording.
- Select the line immediately before the one you want to adjust.
- Turn on Manual Sync, or press M.
- Play the recording.
- As the speaker finishes the current line and begins the next, press the period (.) key. SyncDepo sets the next recorded line’s start time to the current playback position and selects that line.
- Continue through the lines you want to adjust. Press M again to leave manual sync mode.

Useful shortcuts in manual sync mode:
| Key | Action |
|---|---|
| Space | Play or pause. |
| Period (.) | Set the next recorded line’s start time during playback. |
| Up / Down arrow | Move to the previous or next recorded line. |
| Left / Right arrow | Move the current line’s timestamp earlier or later by 0.25 seconds. |
| N | Start playback just before the next line with low confidence or an out-of-order timestamp. |
| G | Mark the current timing as good after checking it. |
| X | Mark the current line as having no recorded audio. |
| 1 / 2 / 3 | Set playback speed to 1×, 1.5×, or 2×. |
| M | Turn manual sync mode on or off. |
Adjust several timestamps together
If several lines need the same adjustment, right-click a timestamp and select Adjust timestamps from here to shift recorded lines from that point to the end.
To adjust a specific group, select timestamps using Ctrl on Windows or Command on Mac, then right-click and select Adjust selected timestamps.
Reconnect moved recordings
If you’ve moved the original recordings, select Remap Media. Update the file list with the recordings in their original order, then select Save Changes.

Changes save automatically
SyncDepo automatically saves your edits to the open .syncd file. To preserve the original timings, make a copy of the file before starting QC.
Link exhibits (optional)
Link exhibit files to references in the transcript so recipients can open them while reviewing the deposition.
Linked exhibits are included in viewer packages and published Links. The .xmef and .lef export formats also include linked exhibits.
Add exhibit files
- In the sync editor, select Link Exhibits.
- Select Add Exhibit Files and choose your files.
- Review the detected exhibit numbers and transcript references.
- Select Save Changes.
SyncDepo accepts PDFs, images, video, audio, spreadsheets, text files, and archives.
Use filenames that identify the exhibit
SyncDepo uses each filename to identify the exhibit number or letter, then finds matching references in the transcript. For example:
Exhibit 15.pdfExhibit A.pdfExhibit 9A.pdf
If SyncDepo can’t identify an exhibit, it appears under Exhibit Number Required. Enter its number or letter, then select Add. You don’t need to rename the file.

Add an alternate name
If the transcript refers to an exhibit by another name, add that wording as an alias. For example, an exhibit might also be called “Bates 3394.”
- Under the exhibit, select + Add alias.
- Enter the alternate wording used in the transcript.
- Review the matching references, then select Add.
- Select Save Changes.

Link a reference manually
If a reference wasn’t detected:
- Select the plus icon beside the exhibit’s transcript references.
- Enter the page and line in Page:Line format, such as
45:3. - Select Load Line.
- Select the text you want to link to the exhibit.
- Select Save Reference, then Save Changes.

Remove an incorrect reference
Select the × beside a page-and-line reference to remove that link.
To remove an exhibit and all its references from the sync, select its trash icon. This doesn’t delete the original exhibit file.
Select Save Changes when you’re finished.
Keep exhibit files available
Keep the original exhibit files available until you’ve exported the package or published the Link. SyncDepo copies them into the delivery.
If you change exhibit links afterward, export a new package or publish a new Link before delivering it.
Export sync files
After QC, export your sync in the format required by the recipient’s software. Individual sync files contain transcript and timing information; you’ll usually need to deliver the recordings with them.
For a complete delivery folder with recordings and viewers, use SyncDepo Viewer Package, covered in Export and deliver a package.
Export an individual format
- Open your
.syncdfile. Make sure you’re signed in and connected to the internet. - Select Export, then Individual Sync Files....
- Select the required format.
- Choose where to save the export.
For subtitle exports, choose a destination folder. SyncDepo creates a separate .srt file for each recording.

Choose an export format
| Format | Use |
|---|---|
| .xml | OnCue. |
| .mdb | Sanction. |
| .cms | TrialDirector 6 and NextPoint. |
| .dvt | DepoView and TrialDirector 360. |
| .xmef | TextMap, including linked exhibits. |
| .ptf | Portable Transcript Format. |
| .pts | Timaro post-production timestamps. |
| .srt | Subtitles for compatible media players. |
| .txt | A readable transcript with timestamps. |
| .lef | LiveNote and Westlaw Case Notebook, including linked exhibits. |
| .vid | VideoNote timing data for compatible applications, including LiveNote and Westlaw Case Notebook. |
If you’re unsure which format to use, ask the recipient which application they use and which import format they need.
Include the recordings
Deliver the exported sync file with the recordings it references. Keep the recording filenames unchanged so the recipient’s software can match them to the sync.
To include the supported export formats, recordings, linked exhibits, and viewers in one folder, export a SyncDepo Viewer Package.
Export again after making changes
Exported files are copies of the sync at the time of export. If you change timings or exhibit links afterward, export new copies before delivering them.
Export and deliver a package
A SyncDepo Viewer Package combines the synchronized transcript, recordings, supported export formats, linked exhibits, and viewers in one folder.
Use a package when the recipient needs a complete copy of the deposition.
Create a package
- Open your
.syncdfile and finish QC. Make sure you’re signed in and connected to the internet. - Select Export, then SyncDepo Viewer Package.
- Choose a destination folder.
- Wait for the export to finish, then select Open Folder.
SyncDepo creates a deposition folder inside your selected destination. The export includes copies of the recordings, so allow enough disk space for them.

Understand the package contents
| File or folder | Contents |
|---|---|
| media | Copies of the recordings and subtitle files. |
| loadfiles | Sync files for compatible applications, including the packaged .syncd file. |
| exhibits | Linked exhibit files, if included. |
| assets | Branding and supporting viewer files. |
| SyncDepoViewer.exe | The included Windows viewer. |
| SyncDepo Viewer (Mac).zip | The included Mac viewer, zipped for distribution. |
| Viewer.html | A viewer that opens in a browser without installing an app. |
The package also includes a timestamped text transcript and files used by the third party legacy viewer app DepoView.

Deliver the whole folder
Copy the complete package folder to your delivery location, or compress it into a ZIP file for transfer.
Keep the filenames and folder structure intact. The viewers and sync files depend on the other files in the package.
You can add other files to the package, such as delivery notes or supporting documents. Additional files won’t affect how the package works.
If you send a ZIP file, tell the recipient to extract the entire package before opening a viewer:
- Windows: Open
SyncDepoViewer.exe. - Mac: Extract
SyncDepo Viewer (Mac).zipinside the package folder, then open the extracted viewer app. - Browser: Open
Viewer.html.
The Windows and Mac viewers are included with the package, so recipients don’t need to download a separate SyncDepo viewer.
Deliver an updated copy after changes
If you change timings or exhibit links after exporting, create and deliver a new package so the recipient has the latest version.
Share a deposition with Links
Publish a deposition to get a shareable link. Recipients can watch or listen to the recording alongside the synchronized transcript in their browser, without a SyncDepo account.
A Link also lets recipients download the complete deposition package.
Publish a deposition
- Open your
.syncdfile and finish QC. Link any exhibits you want to include. - Select Export, then Publish (Get a link).
- Under Keep the link online, choose how long the Link stays online.
- Review the publish fee and your remaining credit balance.
- Select Publish, or Publish for [credit amount] for a paid option.
Publishing uploads the recordings, transcript, export files, and linked exhibits. Keep SyncDepo open and your computer connected to the internet until publishing finishes.
You can select Continue in background to keep working in SyncDepo. Follow the upload’s progress on the Links page.

Choose how long the Link stays online
| Option | Publish fee |
|---|---|
| 30 days | Free. |
| 90 days | Free. This is the default. |
| 1 year | 1 credit for packages up to 20 GB. |
| Indefinitely | 1.5 credits for packages up to 20 GB. |
Packages can be up to 30 GB. The free options have no size surcharge. For paid options, packages over 20 GB cost an additional 0.5 credits per extra GB, rounded up. The confirmation shows the total fee before you publish.
The expiration period starts when the Link becomes live.
Indefinitely has no scheduled expiration. Links with no views or activity for 24 months may be removed. We’ll email you first with an option to keep the Link online.
Add a password (optional)
Without a password, anyone with the Link can open the deposition. To require a password, set one before sharing:
- After publishing, select Add a password to this link.
- Enter a password.
- Select Set and wait for Saved.
Give the password to your recipients along with the Link. You can change or remove it later from the Links page.

Check and share the Link
Select Open in browser to check the published deposition, then select Copy link to share it with your recipients.
Recipients can review the deposition online or select Download package to save a complete copy. Encourage them to download the package if they need to keep it after the Link expires.

Manage your Links
Select Links in SyncDepo to find your published depositions. You can search by deponent or deposition date.
Select Copy link to copy a deposition’s URL, or Manage to review its details and change its settings.

Review a Link’s details
The details show the publication date, package size, view count, last viewed time, expiration, and password status.
Select Copy to copy the URL or Open to view the deposition in your browser.

Change or remove a password
- Select Manage beside the deposition.
- Beside Password, select Set or Change.
- Enter a new password, or select Generate password.
- Select Save.
Give the new password to your recipients.
To stop requiring a password, select Remove password. Anyone with the Link can then open the deposition.
Upgrade or renew a Link
- Select Manage beside the deposition.
- Beside Link expires, select Upgrade, Renew or upgrade, or Renew, depending on the Link’s current status.
- Choose an available option under Keep the link online.
- Review the fee, then select Upgrade for [credit amount] or Renew for [credit amount].
Upgrades cost the difference between the current and new options. Renewing a 1-year Link costs the full 1-year fee again, including any applicable size surcharge.
A new 1-year period starts when you upgrade or renew. It doesn’t add a year to the previous expiration date.
Free 30-day and 90-day Links can be upgraded to a paid option. They can’t be extended for free or switched between the two free options. You can’t shorten a Link’s expiration period.

Restore an expired Link
Recipients lose access when a Link expires.
For 14 days after expiration, the published files remain available for recovery. For a timed Link, open Manage and select Renew to review the available paid options and bring the same Link back online.
If an indefinite Link expires through inactivity, use the keep-online option in the warning email to restore it during the recovery period at no charge.
After that recovery period, the published files are deleted. To share the deposition again, publish it from your saved .syncd file and original recordings, then send the new Link to your recipients.
Copies that recipients have already downloaded remain available to them.
Share revised timings or exhibits
Changes to your local .syncd file don’t change an already published deposition.
After making changes, select Export, then Publish (Get a link) to publish the revised version. Choose an expiration option and review any fee as usual.
Check the new Link and send it to your recipients. You can delete the previous Link when you no longer want recipients to use that version.
Delete a Link
- Select Manage beside the deposition.
- Select Delete link….
- Review the confirmation, then select Delete.
The Link stops working immediately. Deleting it doesn’t remove your local files or copies recipients have already downloaded.
Review a deposition in the viewer
The SyncDepo Viewer lets recipients play recordings alongside the synchronized transcript, search testimony, open linked exhibits, and create highlights.
The Windows and Mac viewers are included in each package. Recipients don’t need a SyncDepo account.
Open the included viewer
If you received a ZIP file, extract the entire package first.
- Windows: Open
SyncDepoViewer.exein the package folder. - Mac: Extract
SyncDepo Viewer (Mac).zipinside the package folder, then open the extracted viewer app.
The viewer opens the packaged deposition automatically. If it asks you to locate the package, select Open Package Folder… and choose the complete deposition folder.
Keep the viewer with the rest of the package so it can find the recordings and exhibits.
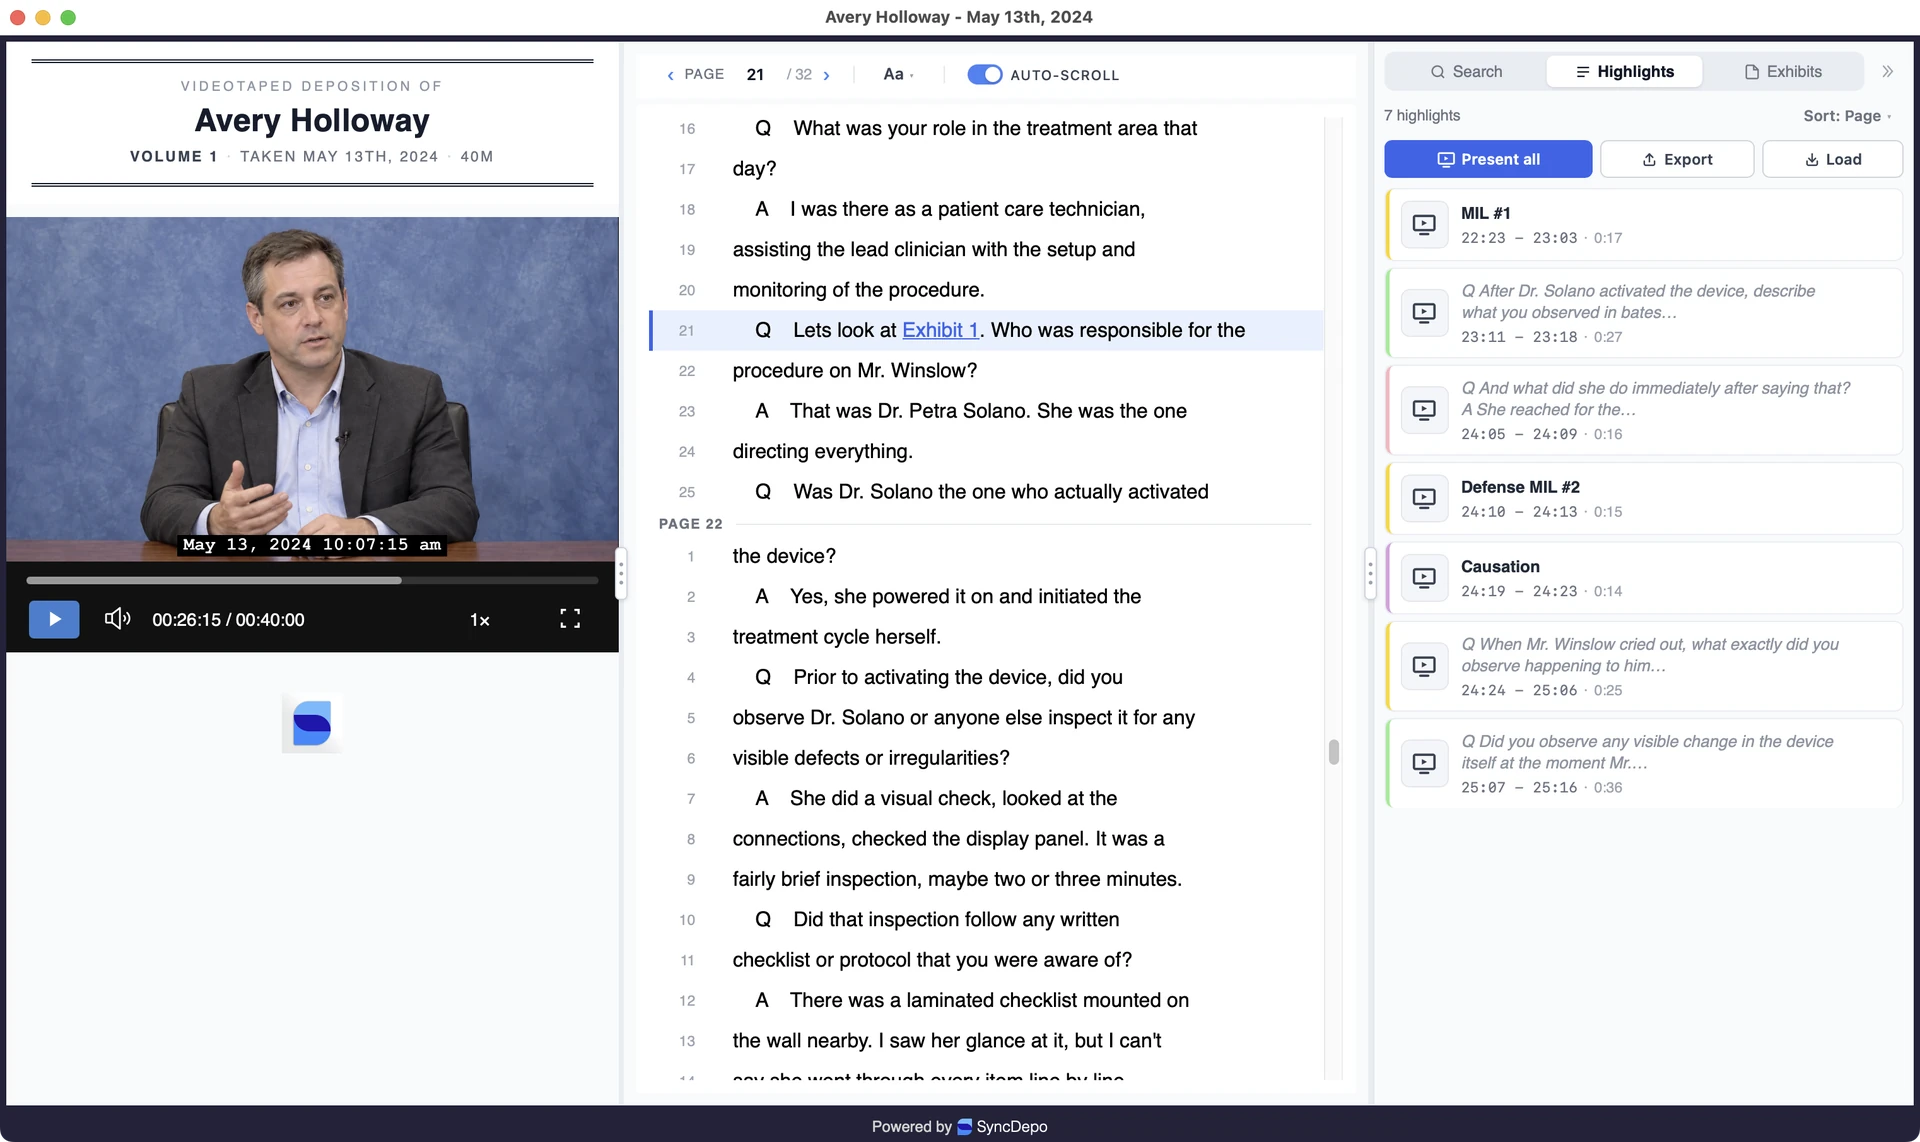
Play and navigate testimony
Select a transcript line to move the recording to that point. Use the player’s play/pause button or press Space to start or pause playback.
Auto-Scroll keeps the transcript following the recording. Turn it off to read another part of the transcript while playback continues.
To go to a specific page, enter its number in the Page box and press Enter. Use the text controls to adjust the transcript’s appearance and size.
Select the fullscreen control to watch with transcript captions. Press Esc to return to the viewer.
Search the transcript
- Select the Search tab.
- Enter a word or phrase.
- Select a result to move the transcript and recording to that testimony.
Results show the matching text and its page and line numbers.

Open linked exhibits
If the package includes exhibits, select the Exhibits tab.
Select Open beside an exhibit to open its file. Expand the exhibit to see its transcript references, then select a reference to move to that testimony.
You can also select an exhibit link directly in the transcript.

Highlight testimony
- Drag across the transcript lines you want to highlight.
- Right-click the selection.
- Select Highlight to use the current color, or Highlight in color… to choose another.
You can also hold Shift while dragging across lines, then release it to highlight the selection in the current color.
Add a label to describe the testimony, such as “Impeachment” or “Damages.” Select the highlight’s Add label control, enter the label, and press Enter.
The Highlights tab lists your selections. Select a highlight to return to it, or sort the list by page, creation order, or color.
Select Present all to play the highlighted testimony in fullscreen, in the list’s current order.

Export clips or designation lists
- In the Highlights tab, select Export.
- Choose which highlights to include.
- Choose whether to export separate clips, merge clips by color, or merge all clips.
- Choose the sort order and format.
- Select the export button and choose where to save the files.
Available formats include video clips, an OnCue Clips List File, a TrialDirector CCS File, and a Text File of the selected testimony.
For video clips, select Burn subtitles into video if you want the transcript text included in the picture. Audio-only depositions export audio clips instead.

Save or share your highlights
Highlights save automatically on your computer.
To back them up or move them to another computer, select Export in the Highlights tab and choose Highlights File (.json).
To bring saved highlights into the same deposition, select Load in the Highlights tab and choose the JSON file.
Review a deposition in your browser
You can review a deposition in your browser by opening a shared Link or the Viewer.html file included in a downloaded package.
Both browser viewers support synchronized playback, transcript search, linked exhibits, highlights, and fullscreen presentation. You don’t need a SyncDepo account or a separate viewer app.
Open a shared Link
- Open the Link provided by the sender.
- If prompted, enter the password the sender gave you.
- Use the playback controls and transcript to review the deposition.
A shared Link requires an internet connection and remains available until it expires or the sender deletes it.
Select Download package to save a complete copy before the Link expires. On a phone, you’ll find this option under Files.
After downloading, extract the entire package to use its included viewers.
Open Viewer.html from a package
- If the package is zipped, extract the entire ZIP file.
- Open the extracted deposition folder.
- Open
Viewer.htmlin your browser.
Keep Viewer.html with the rest of the package. It uses the recordings and exhibits in the neighboring folders.
Once the package is downloaded and extracted, you can use Viewer.html without an internet connection.
Search, highlight, and present testimony
Use Search, Highlights, and Exhibits as described in Review a deposition in the viewer.
Select a transcript line to move to that testimony. Create highlights to organize passages by color and label, then select Present all to play them in fullscreen.
On a phone, use Select to choose the first and last lines of a passage, then highlight or copy the selection.
Export highlighted testimony
- In the Highlights tab, select Export.
- Choose the highlights to include.
- Choose the sort order and an available format.
- Select the export button to download the file.
Browser exports include OnCue designation lists, TrialDirector CCS files, text files, and Highlights File (.json).
To create video or audio clips, open the downloaded package in its included Windows or Mac viewer.
Keep a copy of your highlights
Browser highlights save in the browser you’re using. They don’t automatically appear on another device or in another browser.
Clearing browser data, using private browsing, or moving a local package can affect saved highlights.
To keep a separate copy, select Export and choose Highlights File (.json). Use Load in the Highlights tab to bring that file into the same deposition in another viewer.
Downloading the deposition package doesn’t include the highlights you created in your browser. Export them separately if you want to keep them.
Customize SyncDepo settings
Select Settings to adjust the app’s appearance, default save location, file naming, and delivery branding.
Settings save as you change them. For Vendor URL, finish entering the address, then select another control to save it.
Adjust the display
| Setting | What it changes |
|---|---|
| Interface Size | Use − and + to make the app’s controls and text smaller or larger. |
| Theme | Choose Light or Dark. |
| Transcript Font | Choose Sans Serif, Serif, or Monospace for transcript text. |
| Confidence Colors | Choose the colors for high-, medium-, and low-confidence timings during QC. |
Changing confidence colors changes their appearance, not the confidence assigned to a timing.

Choose a default sync folder
Under Default Sync Folder, select Browse and choose where you want downloaded .syncd files saved by default.
You can choose a different location when saving a file.
Customize file naming
- Under File Naming, select Edit….
- Choose a preset or build a naming scheme using the available name, date, volume, and separator options.
- Drag the items to change their order, or select × to remove one.
- Review the Preview, then select Save.
A naming scheme must include the deponent’s last name or last initial and a complete date.
The default is Last, First YYYY-MM-DD. Your chosen scheme supplies the suggested names for downloaded syncs, exports, and packages. Changing it doesn’t rename existing files.

Add your branding
Under Custom Branding, select Select Logo to choose a PNG, JPG, JPEG, or GIF image.
The image must be 50–500 pixels wide and 25–300 pixels tall.
Use Change to choose another logo or Clear to remove it.
Under Vendor URL, enter your company’s complete website address, such as https://example.com. Recipients can select your logo in the viewer to open that website.
If Settings shows Branding is managed by your organization, your organization’s logo is applied automatically.
Branding is included when you create a package or publish a Link. Changes apply to new deliveries; existing packages and published Links keep their previous branding.

Include timestamps in XMEF exports
Include timestamps in PTF Files adds line timestamps to the PTF file contained inside an XMEF export.
Turn this on if your receiving workflow requires those timestamps. The option is off by default.
Choose whether to share usage reports
Use Share usage data and error reports to turn reporting on or off.
These reports help us identify problems and improve SyncDepo.
Restore default settings
Select Reset to Default Settings, then review and accept the confirmation.
This resets the theme, interface size, transcript font, confidence colors, file naming, and PTF timestamp option. Your default sync folder, logo, and vendor URL stay as they are.